Blog
Gardening Tips
Everything important you need to know about seed starting!
Everything important you need to know about seed starting!
SOIL : The best soil to use for seed starting in light & fine so young roots can easily grow & push through the soil. It is best if the soil mix you choose contains sphagnum peat moss for moisture retention & vermiculite or perlite for aeration. We recommend & carry “Fertilome Seed & Cutting” soil mix which contains sphagnum peat moss, horticultural perlite, AND limestone & dolomite which helps out with adjusting the soil’s PH. Fertilizer is not needed at this beginning stage!
LIGHT: Your seeds will need bright light to germinate! If you are sowing seeds in a greenhouse, four-seasons room, or a brightly lit window, you’re good to go! YAY YOU! Your seeds are going to LOVE the natural sunlight. However, if you’re sowing seeds in an unlit space like an inner room without windows or a basement, you will need to provide grow lights. Make sure you purchase an actual grow light instead of using normal house light bulbs. Grow lights actually mimic daylight. We offer several kinds of these in our Garden Center! We carry grow lights on string cords to hang, as well as grow light bulbs that can screw directly into any light socket you already have… which is VERY convenient!
PLANTING: As always, read your seed packets! They will provide most of the information you need to know. Reading instructions always sets you up for success 😉 The packet will tell you when to sow, how deep to bury the seed, how long the seed will take to germinate, when to move them outdoors, etc! Some seeds can actually be sown directly outside & do better that way, so make sure you sort out what needs to be started indoors vs what can actually just be popped right into the garden as a seed! Lets talk about pots really quick. We carry a nice variety of different options. We have the traditional black plastic seed cells trays (usually 48ish openings), the trays without holes to go underneath, & the grow dome that snaps onto the top. Planting in peat pots has become pretty common… we carry them in a 3” pot size. Normally you will want to plant 2-3 seeds in each of those for best germination results. We do carry the peat pellets as well! These are pretty cool. Add water, add seeds & watch them germinate! The really handy part is that you can pop the whole thing into the ground when you’re ready to plant outside. The roots will grow right through the peat. We sell these pellets individually, or in little greenhouse grow dome kits. If you’re wanting the easiest soil option, we also have seed cell kits that already are filled with organic seed starting soil. Pop in your seed, water it, & you’re good to go!
MOISTURE: Consistent moisture is KEY for germination. Make sure the soil is always damp, but not soaking & drowning the seeds. This is where grow domes come in handy. They provide a greenhouse effect, which keeps humidity & moisture trapped inside. Once your seeds have sprouted, remove the dome & gently begin watering. You can water with gentle overhead sprinkles (the babies are fragile!) or you can bottom water your sprouts, letting them sit in water for 20-30 minutes & then removing them… good to go!
WARMTH: Soil warmth should be around 65-80 degrees. Many people rely on sunlight or grow lights to provide the warmth, but if you’re in a chilly area like the basement, heat mats work wonders! Even farmers will use heat mats inside the greenhouse to quickly raise the temperature of the soil! This will really boost & speed up germination time! Find them here in our Garden Center!
HARDENING: Come spring, once temperatures are above freezing, begin to set your sprouts outside for an hour or so, on a cloudy day… gradually increase their outside time & sunlight exposure so they adjust to being outside! This gets them ready to take on the elements once you plant outside!
PLANTING OUTSIDE: Once frost is past & your seedlings are hardened, it’s time to transplant them into the ground! Use those handy dandy seed packet instructions to figure out spacing! Dig a hole just big enough for the roots to fit into… & make sure to pack the soil closely so there’s no air pockets. Give them a drink & we’re off to the races! YeeHaw!
Pruning Guidelines!
Pruning your shrubs seems scary… right? What if you cut off the wrong branches, prune at the wrong time, or take too much off the plant?! Here’s the why, when & how to pruning that will help you conquer this nerve-wracking process!
WHY should I prune a shrub?
Most shrubs don’t require regular pruning in order to be healthy & beautiful! When you’re considering pruning a shrub in your yard, don’t be hasty! Stop and ask yourself WHY you want to prune it. Never prune without a reason! Reasons you might want to prune a shrub:
-Improve flowering and fruiting
-Improve stem color on plants like dogwood
-Improve the plant’s habit or shape
-Encourage rebloom
-Neaten a plant’s appearance by removing old blooms or wayward shoots
-Rejuvenate or shorten an overgrown shrub
-Create a special feature, like a topiary or formal hedge
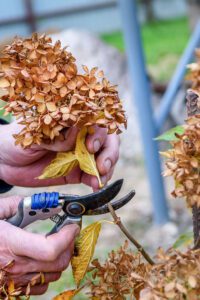
HOW do I prune a shrub?
-Make sure to use a sharp pair of bypass pruners. Bypass pruners ensure a complete, clean cut (instead of smashing the branch)!
-Cut back to just above the bud, or at the next branching juncture.
-When cutting a stem, avoid cutting into thick wood where there aren’t any buds.
-When you prune, cut straight across instead of at an angle. This will speed up the healing process (less surface area exposed!)
-The rule of thumb is to remove about one third of the plant. You can do this in two ways. #1: Cut back all the branches about a third of the way down. This will shorten your entire plant, and also ensures even & vigorous growth. #2: Remove about one third of the stems entirely, all the way down to the base of the plant. This will encourage new growth from the base of the plant and will improve it’s health and growing habit!
WHEN do I prune a shrub?
The answer to this question depends on whether the shrub blooms on old or new wood!
Old wood: Shrubs that bloom on old wood create their flower buds for the following year almost as soon as they finish blooming during the current year, so these buds will be present for most of the year! Generally speaking, the earlier in the spring a plant blooms, the more likely it is that it flowers on old wood! Plants that bloom on old wood should only be pruned immediately after they flower. If won’t hurt the shrub to prune it later in the season, just don’t expect it to bloom the following spring, since you will be cutting off it’s buds!
-Examples include: Azalea, Deutzia, Rhododendron, certain Hydrangea, Forsythia, Lilac, Mock Orange, Ninebark, Weigela
New wood: Shrubs that bloom on new wood create their flower buds after new growth has begun in the spring. Plants that bloom on new wood can be pruned early in the springtime. It might be helpful to wait until you see new growth beginning to emerge on the stems, this will allow you to see exactly where there is healthy new growth.
-Examples include: Butterfly Bush, Coral Berry, Diervilla, Smooth Hydrangea, Panicle Hydrangea, Potentilla, Rose of Sharon, Rose bushes
Special Tips
-Evergreens like arborvitae & boxwood are best pruned in the spring, after new growth has appeared.
-Dead wood can be removed at any time!
-Avoid pruning: Bigleaf Hydrangea, Rhododendron, Viburnums grown for their berries, Winterberry Holly, Oakleaf Hydrangea
Deadheading
Is your garden filling up with spent flowers?
Is your garden filling up with spent flowers? If you don’t mind the mix of fresh and mature flowers, you can absolutely leave them alone. Shrubs don’t need to be deadheaded to remain healthy or, if they rebloom, to keep the show going! But if you have the itch to snip, we’ve listed shrubs you can deadhead (as long as you’re careful)!
Deadheading definition: The removal of spent or unattractive flowers. This is done to either improve your view or save the plant some energy.
General how-to for deadheading: Follow the stem of the spent flower down to a set of leaves and snip just above them. Even shrubs that flower on old wood can be deadheaded.
There are a number of reasons flowers on a newly planted shrub would turn brown, but the most common is stress. Shrubs planted in the summer are more sensitive to heat and water stress, and the plant’s first priority is to maintain the foliage and build a root system. This may result in the flowers spending faster than normal. It’s best to just deadhead them to save the plant energy. After the plant is established, its future blooms will last longer.
SNIP
Some spent flowers either aren’t handsome or actively waste the plant’s energy by turning into seeds. In both cases, they can be removed.
*Annuals: Marigolds, Geraniums, Dahlias
*Lilac
*Hydrangea
*Butterfly Bush
*Rose Bushes
*Spirea
*Perennials: Coneflower, Hosta, Daisy, Black Eyed Susan, Coreopsis, Lady’s Mantle, Salvia
Shrubs that promise a fall or winter show with berries, hips, or elegant looking dried flowers don’t have to be cut.
Building Drought Tolerant Gardens!
Building drought tolerant gardens!
Gardens in our area are entering Autumn stressed from scorching hot temperatures & the lack of summer rains. However, some plants adapt quickly to dry & hot conditions! Drought-tolerant plants are not only tough and dependable, but also beautiful and functional in landscaping! We encourage you to consider planting drought-tolerant plants this fall that won’t require quite as much daily watering or care next summer! We have an abundance of options out in the nursery, and some friendly Green Thumbers who would love to assist you in finding some beautiful drought-tolerant plants for your yard!
Lack of water can be a major stresser for some plants. Although plants experience water stress due to a lack of rainfall or routine watering, they also lose water naturally through the pores in their leaves. This is completely normal and it’s called “transpiration”. The pores in the plant’s leaves open up to accept carbon dioxide into the leaves for photosynthesis, but unfortunately the open pores also allow water vapor to escape or evaporate. Signs that a plant is stressed due to lack of water include: curling leaves, yellowing of leaves, stunted overall growth, and leaf scorch which looks like crunchy brown burns on the top of the leaves. All of these signs are visible to the human eye & can be addressed with more water! On the flip side, drought-tolerant plants adapt to dry conditions based on their ability to increase water absorption and conservation. They have deeper, better-developed root systems, helping them to source water from further down in the soil, which is helpful during hot & dry conditions. Many drought-tolerant plants also have smaller leaves to reduce the leaf surface area, meaning less exposure to water loss! Leaves are also protected from evaporation by either wax-coating or tiny hairs. Both types of leaves trap water and reduce the amount of water loss!
Consider these species of drought-tolerant plants that thrive in hot, dry conditions: Baptisia, Coneflower, Joe Pye Weed, Big Bluestem, Little Bluestem, Switch Grass, Coreopsis, Catmint, Yarrow, Butterfly Weed, Gaillardia(Blanket Flower), Daylily, Russian Sage, Sedum, Beebalm, Liatris, Beardtongue.
Remember: If you’re wanting some major new landscaping done in your yard, you can trust our team to come check out your area & design something new & beautiful for your outdoor living space!! MAKIN IT LOOK GREAT SINCE 1948!

All About Grubs!
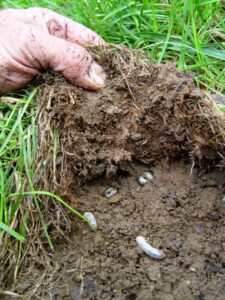
Grubs hatch mid-August! After this time, you can no longer use grub preventative… which prevents the eggs from hatching, which has already happened this year, so now you have to apply a Grub Killer to your lawn! You won’t see the damage until well into September, when you will see brown patches start to appear in your lawn. Dig and lift up one square foot of sod, and if you have a grub problem, you’ll see at least 8-10 grubs under the sod in that one square foot of area. In general for any yard, if you go out and dig up a one square foot area of sod, you may see a grub or two, which is normal and nothing to fret about. The higher number of grubs is where you start seeing problems.
Grubs typically tend to lay their eggs in lush green grass in June & July, with the eggs hatching in mid August. So if you’re watering your yard and keeping it super green and healthy, the grubs are going to love that. These lawns will be more apt to have eggs hatching and grub problems, especially following a summer like this one, because they’ve more than likely laid their eggs in your nice, lush, thick green turf & avoided yards that are on the dry side. These grubs are high-class, living their lavish lifestyles under your lawn. You can apply grub killer mid August through October- this is when you’ll really start to notice damage if you have a grub problem. Grub killer will kill grubs right away, as soon as there is direct contact. It kills within 24 hours. You will need to apply Grub Killer and then water it in well right away, so that it gets carried down to where the grubs are immediately… do not wait until it rains. Grubs dwell right below the root system of your sod and they feed on the roots. This causes the roots to die, leading to those horrible brown patches that you see on the surface of your lawn. This grass won’t grow back, it will have to be removed and re-seeded for new grass to grow there.
If you’re having grub damage this year, we highly suggest that you apply grub preventative next year during the months of May, June & July, before grub eggs can hatch!!

Plants
Weigela & our most popular varieties!
All the good information about Weigela!
Weigela are considered one of the easiest flowering shrubs in our area to care for. They come in a wide variety of full-growth sizes, making it easy to find a variety for pretty much any area of your landscaping! Most of them thrive in full sun… Hummingbirds LOVE them… There’s many different color choices to choose from, regarding flower color & foliage color! Weigela blooms on OLD wood from the previous year, so wait to prune them until after they’re done blooming in the spring/early summer if you don’t wanna cut off it’s buds! (exception: Sonic Bloom sets out flowers on old & new wood… but I still would wait to prune it until after it’s done blooming in the spring!)
Here’s the varieties we typically have in stock out in our nursery!
Wine & Spirits:
-rich wine/deep purple foliage
-white contrasting flowers in the late spring to early summer
-3 to 5 ft tall & wide
-deer resistant
Midnight Sun: (newer variety!)
-light pink flowers that bloom late spring
-coppery orange foliage that is constantly changing colors into red & burgundy
-12 to 18 inches tall & wide (shortest variety available)
My Monet Purple Effect:
-light pink flowers in late spring
-variegated cream, light green & lavender foliage
-full sun to part shade
-18 to 30 inches tall & wide
Spilled Wine:
-2 to 3 ft tall, 3 to 4 ft wide
-full sun
-deep purple foliage
-bright pink flowers in the spring & summer
-deer resistant
Wine & Roses:
-rich dark purple foliage
-deer resistant
-rosy pink flowers
-2 to 3 ft tall, 2 to 2.5 ft wide
Sonic Bloom:
-white flowers that turn pink
-blooms early summer until frost!
-blooms on old & new wood!
-4 to 5 ft tall & wide
Czechmark Trilogy:
-pink, white & rosy flowers that bloom all at once!
-bright green foliage
-blooms late spring into early summer
-full sun
-3 to 4 ft tall & wide
-deer resistant
Snippet:
-deep green foliage
-1 to 2 ft tall & wide
-deep pink blooms in spring, summer & fall!
Midnight Wine Shine:
-dark glossy foliage
-bright pink flowers in the spring
-1 to 2 ft tall, 2 to 2.5 ft wide
-deer resistant
Electric Love:
-vibrant red flowers
-dark foliage
-1 to 2 ft tall, 2 to 3 ft wide
-full sun
Stunner:
-vibrant pink flowers
-dark purple foliage
-3 to 4 ft tall & wide
-full sun
Most Common Houseplant Pests
MOST COMMON HOUSEPLANT PESTS!
Houseplants bring the green of the outside world inside for us to enjoy! Let’s talk about pest control, how to remedy pest problems & how to identify common pests!
APHIDS: Yuk! These little guys are typically found enjoying a meal on the under-side of leaves or new growth! They suck sap out & give your poor plants yellowing & deformed leaves!
-What to look for: small, pear shaped bugs ranging in color from green, yellow, brown or black.
-Signs they’re “visiting”: you will notice shiny, sticky areas on your plant! Look closer for the bugs!
-Control: hand wipe the bugs & residue off with warm, soapy water… a drop of dawn dish soap does great! You can even wipe with swabs dipped in 70% alcohol mix. Spraying with an insecticidal soap is recommended to reduce re-appearances!
FUNGUS GNATS: These gnats are a pain in the you-know-what. Usually, thankfully, a few won’t do a ton of harm to your plants… but we don’t want them! If you don’t get rid of a few, it WILL turn into a ton. If the problem gets intense… they will begin to lay their eggs in the soil of your plant! Eventually the larvae will begin feeding on decaying plant material in your soil & on your plant’s root system!
-What to look for: little black bugs buzzing around near your plant, especially when you move or shake your plants! No thanks!
-Control: re-pot your plants with quality soil that drains well. (we recommend Fertilome ultimate potting mix.) Dense, over-watered soil is where gnats love to breed! Do not use soil with moisture control for indoor houseplants.
-Remedy: indoor/outdoor spray & definitely a good granular insecticide systemic in the soil to kill larvae & prevent eggs from hatching! Gnat traps also work as well to catch what’s flying around and lure them out of the soil!
LEAF MINERS: invisible to the eye, but they’re not good at covering their tracks!
-What to look for: little trails found on leaves. Leaf Miners sneak around between layers of the leaf. I imagine them digging a path into the layers of a leaf like miners digging into the ground and making a tunnel. Good name for them!
-Control: remove damaged leaves. Use insecticidal spray to prevent them from spreading!
MEALY BUGS: gross… gross gross gross!! These small, white, fluffy pests are disgusting! They usually begin on the under-side of the leaves & they love to feed on new growth. They hide out in the crevices of plant stems where leaves emerge. Once your plant is really infested, they’re EVERYWHERE!! They spread very quickly.
-What to look for: yellowing leaves, sticky clumps on leaves, masses of white “cotton”.
-Control: hand wipe the leaves, wash in warm soapy water, spray with indoor/outdoor insecticide aerosol!
SCALE: most people don’t know these are bugs… they can look like part of the plant at first glance! These little guys are “armored” pests. Most of them are flat, rounded, hard-bodied growths that appear clustered on stems & under-sides of leaves. Scale ranges in color & normally there will be a darker spot in the center of their “bodies”
-Control: scrape these off with your fingernail…unless that creeps you out. Then a good second choice is to brush them off with a toothbrush.
-Remedy: Neem oil is a recommended product!
SPIDER MITES: We… and by “we” I mean all of us… DREAD spider mites. These pests are difficult to see with the naked eye, but they can be spotted by their silky webs that they leave among stems & leaves. Spider mites cause a lot of damage, quickly. It’s a good idea to use a preventative, because it’s way easier to prevent than it is to treat.
-What to look for: discoloring on the leaves like the color is being “sucked out”. Look for webbing & tiny little white particles that look like dust. If you see discoloring, use a microscope or magnifying glass to try to spot the spider mites.
-Control/remedy: harder than most pests. Thoroughly spray the plant to dislodge the mites & their webs. Use insecticidal soap, neem oil, an insecticide containing sulfur, or indoor/outdoor aerosol spray. This will take several weeks of care with re-application.
*When purchasing alocasia, palm, ivy, etc… use a granular insecticide as a precaution to prevent mites!
THRIP: speedy little winged monsters! They are normally found on top of leaves, feeding on sap.
-What to look for: long, thin, tan bugs. Damage will look like leaves curling & starting to be misshaped, color fading & leaves browning & dying.
-Control: rinse plant, spray with insecticide. Spinosad works well on thrip.
String Of Pearls
How to care for your string of pearls!!
Happy & Healthy Pearls:
-
plump & round with only a slight point
-
glossy & shiny
-
smooth green skin
-
transparent and clearly visible “window”
-
firm to the touch
Just keep doing what you’re doing! This is how they should look!
Dehydrated, Thirsty Pearls:
-
lemon shaped and much pointier
-
dull and matte
-
indented creases running from stem to tip
-
“windows” are hard to see
-
hard to the touch
Water more frequently or more deeply, and check the strands. If they have aerial roots, coil them on top of the soil so they can root and the plant can drink more deeply.
Overwatered, Saturated Pearls:
-
completely lost shape, like a deflated balloon
-
orange, wrinkly skin with textures going every which way
-
soft and squishy, very mushy
-
“windows” cannot be seen
Water less frequently, use a smaller pot, switch to terra cotta, make sure they have good drainage & ensure the soil blend dries & drains quickly. Half cactus/succulent soil & half porous gravel like perlite is a good blend. Consider bottom watering & then draining!
String of Turtles
String of turtles!!
String of turtles used to be very difficult to find, but it is becoming easier to get your hands on. String of turtles, also known as Peperomia Prostrata (it’s scientific name) or turtle’s string, is an absolutely lovely trailing plant known for the stunning variegated patterns on it’s leaves that resemble a turtle’s shell. These little turtles are relatively low maintenance.
Light Level: Bright, indirect
Watering: Allow it to dry out between waterings
Humidity: Yes
Temperature: Between 65 – 75 degrees F
Potting Mix: Well draining and well aerated
Fertilizing: Half-strength, twice a month in spring, once a month in summer
Repotting: When it outgrows its current pot
You should put your string of turtles where it receives bright, indirect light. It can be grown in medium light but, as with all plants, the variegation is best maintained in bright light. Don’t leave this plant in direct sun or the poor little turtles could burn! Be sure the sun’s rays are not shining directly on the plant. On the other hand, too little light can lead to leggy growth. That means longer strings with fewer turtles! The plant is trying to grow toward more light and also conserve energy. No natural light? No problem! Grow lights are a real lifesaver! And, when it comes to the string of turtles and other string plants, grow lights are really helpful for making sure light gets to the TOP of the plant and not just the strings.
Since they store water in their fleshy leaves, string of turtles does not need to be watered often. Let the potting mix dry out in between waterings, and do not overwater them or you could put your plant at risk of root rot. Just be sure to feel the potting mix first to determine how wet or dry it is before you water!
String of turtles will be happiest staying in between 65 and 75 degrees Fahrenheit. So, your normal household temperatures will probably be just fine!
Pot your string of turtles in a well-draining and aerated potting mix. Two ingredients that are great for this are a general potting mix with about half as much perlite mixed in. I’ve also seen cactus and succulent potting mix recommended. If you use this, just make sure it doesn’t get compacted over time. String of turtles plants have shallow root systems and grow slowly. Although they grow in length, they don’t typically get too big and wide for their pots. Replace the potting mix once a year, and only repot the plant in a new pot if it has clearly outgrown its current one. In that case, use a pot the next size up from the current one that has drainage.
You shouldn’t need to prune your string of turtles regularly, but you can prune off any unruly or leggy strands, and any dead or dying strands or leaves with a clean pair of pruning shears. Don’t prune off more than a third of your plant at once, but you shouldn’t have to do this anyway.
Native Perennials
Native plants have formed symbiotic relationships with native wildlife for hundreds of years.
Native plants have formed symbiotic relationships with native wildlife for hundreds of years. Therefore, native plants offer a more sustainable environment. These plants can significantly reduce water runoff and, consequently, flooding. They also provide shelter and food for wildlife. Native plants support pollinators and attract a variety of birds which include hummingbirds as well as butterflies and other wildlife by providing diverse habitats and food sources. These native perennials are more hardy to our zone so there’s no need to hold your breath during those wicked winters. They are also of the few plants that are nonhybridized. In their true and pure form, these plants were here before we humans were and will remain long after we’re gone. We have a large selection of native perennials that offer beautiful foliage to pollinating blooms. Our current selection includes:
- Cinnamon Fern
- Eastern Hay-scented Fern
- Golden Star
- Turtlehead
- Marsh Marigold
- Barren Strawberry
- Jeana Garden Phlox
- Ruby Star Coneflower
- Culvers Root
- Geranium M. Espresso
- Pink Manners Obedient Plant
- Summer Nights Oxeye


Perennial Lavender
The Green Thumbers has loads of Perennial Lavender out in the nursery and it is STUNNING!
The Green Thumbers has loads of Perennial Lavender out in the nursery and it is STUNNING!
Known for its strong, fresh scent and aromatic uses, Lavender is a very beautiful and easy-to-grow plant! Every garden needs at least one! Lavender is a great choice for adding interesting
texture, color, and scent to your garden!
A few basic requirements must be followed to ensure it stays healthy and overwinters. Lavender needs full sun at least 8 hours each day, and it loves well-drained soil.
Lavender has a beautiful shrub structure, growing up to two feet high and wide. It has silvery, jagged foliage and bluish-purple flowers, both of which contain scented oil glands. Bees and other pollinators are attracted to the scent and to the high levels of nectar in the flowers.
Timely pruning helps lavender stay compact and well-kept, and it increases flower production. Prune it once in the spring when the new growth appears by pruning off dead stems down to the first set of green leaves. Lavender can also be pruned after it flowers to help keep it compact and it will possibly bloom a second time! Prune off one-third to one-half of the plant. When pruning, do not cut down to the leafless wood… it will not regrow.
Newly planted lavender should be watered regularly the first year. Once established, lavender is drought- tolerant and should only be watered when the soil dries out. Added fertilizer is not necessary when growing lavender; this can cause excessive foliage growth and a decline in flower blooms.
Dried lavender flowers can be used in a variety of ways including cutting for beautiful fragrant flowers in a vase, or for drying! For optimum quality and scent, cut flower stalks when the blooms are about to open. Cut flower stalks can be laid flat or hung in a cool, dry place to dehydrate.

Perennial Ornamental Grasses
Perennial Ornamental Grasses
Some of the easiest, most low maintenance plants you can grow for fall interest in your landscape are perennial ornamental grasses. In fact, most grasses offer great interest all season long! Grasses provide wonderful texture, movement, beautiful plumes & vibrant fall color to your landscaping in the later seasons of the year. We have some great options here at The Green Thumbers including Indian grass, Native grasses, Maiden grass (closest thing to pampas grass that grows here), Switchgrass, Big & Little Bluestem, Fountain, Zebra grass, as well as many other forms of Miscanthus etc…. If your garden is missing these brilliant elements of the autumn landscape, visit us for a walk through the nursery & take a look! We have a goooood healthy amount of NEW grasses that just arrived this week!
Why plant perennial grasses?
-
They are easy to grow and require little maintenance to thrive.
-
They provide additional texture & movement to your landscape.
-
They are long-lived, & super hardy in our area!
-
They bring the element of change to your landscape as they grow and mature through all four seasons. Their interesting texture is present in every season except late winter to early spring.
Whether you use them as screens, accents, or focal points, ornamental grasses are an easy way to add graceful texture and year-round color to your landscape. Most of them are very drought/heat tolerant, keeping their good looks no matter the weather. Plus, they aren’t usually bothered by pests and diseases, & deer tend to leave them alone. Enjoy these tough, versatile perennial plants in your yard! Here’s a few more things we love about ornamental grasses:
Tall grasses in a large grouping can be a perfect solution for blocking an unpleasant view or creating a sort of “privacy screen” to block out traffic or the neighbors. For the best effect, choose a taller variety such as Big Blue Stem, Native Indian grass, or Switchgrass, all of which can reach about 4-6 feet tall when seeded out. Keep in mind that you’ll cut back your ornamental grasses close to the ground in early spring, so there will be a month or two while your grasses are growing that you won’t have that privacy! Taller grasses can also be planted close together to create a unique wind block to your yard during the summer/harvest months!
Ornamental grasses add the best texture to the landscape. You can really maximize this effect by planting several different varieties of grass in the same landscape area to keep the eye moving!
Grasses can do a great job of “softening” the look & feel of an area. In an area with a lot of hardscape such as walls, stonework, paving or larger patios, ornamental grasses can provide a softer flowy feel to your view!
Grasses really shine at the end of the season when most annuals and perennials look worn out. Many grasses offer twice the interest: They have beautiful seed heads and stunning fall color. Switchgrass, Native Indian grass, Blackhawk Big Blue Stem & Little Blue Stem are some of the best grasses for a power punch of beautiful fall color!
Native grasses can be great for attracting wildlife, especially birds. Birds will use the leaf blades for making nests, find shelter in larger grasses, and many bird species will actually eat the seeds!
Our pros out in the nursery can assist you in choosing the perfect grasses needed to add that oomph to your landscaping!! Stop and see us at 3030 Brady Street here in good ole Davenport Iowa! 563-323-0055
Poinsettia Care Tips!
Poinsettia season has arrived, filling our homes with dazzling color just as the world outside turns gray and cold. If bringing one of these beautiful blooming plants home with you is part of your yearly Christmas routine, or if this is your first try, here’s all the tips you’ll need to know to keep your Poinsettia looking bright and beautiful throughout the entire season!
Temperature and humidity: Poinsettias prefer temperatures between 65 and 75 degrees Fahrenheit. Avoid drastic temperature drops, cold drafts, and placing plants next to a cold window… this can cause leaves to wilt. Poinsettias can’t handle frost and can be damaged or killed if temperatures go below 50 degrees, even for a brief time… this means getting a poinsettia home during the holidays can be dicey in Iowa/Illinois! Avoid leaving them in an unheated car, and protect it with a light covering when transporting it from store to car or car to home.
Light: When you purchase a Poinsettia from us for the holidays, it’s primed and ready to perform and will keep on looking good for several weeks no matter where it’s displayed. To make your Poinsettia last even longer, give it as much natural light as you can in mid-winter; however, avoid placing directly in front of hot south-facing windows.
Water: Over-watering is a common killer of Poinsettias. Water your Poinsettia when the surface of the soil feels dry to the touch, but not every day. Remove any foil around the container to allow water to drain. Generally, watering once or twice a week will be perfect if you moisten the soil thoroughly. Avoid wetting the foliage. Make sure your Poinsettia is not sitting in water! On the flip side of that, don’t let your Poinsettia sit dry for too long either. Once the plant gets too dry, it will start dropping leaves!
The famous question: Are Poinsettias safe for pets? Let’s start by saying that despite what you’ve heard, the poinsettia plant is “generally overrated in toxicity.” However, if a stem is broken, the plant leaks a white, milky sap, which can be irritating to mouths or skin if not washed off. So if your pet ingests pieces of a poinsettia, he or she may get an upset stomach, though likely nothing worse.
Seasonal
Everything important you need to know for SEED STARTING!
Everything important you need to know about seed starting!
SOIL : The best soil to use for seed starting in light & fine so young roots can easily grow & push through the soil. It is best if the soil mix you choose contains sphagnum peat moss for moisture retention & vermiculite or perlite for aeration. We recommend & carry “Fertilome Seed & Cutting” soil mix which contains sphagnum peat moss, horticultural perlite, AND limestone & dolomite which helps out with adjusting the soil’s PH. Fertilizer is not needed at this beginning stage!
LIGHT: Your seeds will need bright light to germinate! If you are sowing seeds in a greenhouse, four-seasons room, or a brightly lit window, you’re good to go! YAY YOU! Your seeds are going to LOVE the natural sunlight. However, if you’re sowing seeds in an unlit space like an inner room without windows or a basement, you will need to provide grow lights. Make sure you purchase an actual grow light instead of using normal house light bulbs. Grow lights actually mimic daylight. We offer several kinds of these in our Garden Center! We carry grow lights on string cords to hang, as well as grow light bulbs that can screw directly into any light socket you already have… which is VERY convenient!
PLANTING: As always, read your seed packets! They will provide most of the information you need to know. Reading instructions always sets you up for success 😉 The packet will tell you when to sow, how deep to bury the seed, how long the seed will take to germinate, when to move them outdoors, etc! Some seeds can actually be sown directly outside & do better that way, so make sure you sort out what needs to be started indoors vs what can actually just be popped right into the garden as a seed! Lets talk about pots really quick. We carry a nice variety of different options. We have the traditional black plastic seed cells trays (usually 48ish openings), the trays without holes to go underneath, & the grow dome that snaps onto the top. Planting in peat pots has become pretty common… we carry them in a 3” pot size. Normally you will want to plant 2-3 seeds in each of those for best germination results. We do carry the peat pellets as well! These are pretty cool. Add water, add seeds & watch them germinate! The really handy part is that you can pop the whole thing into the ground when you’re ready to plant outside. The roots will grow right through the peat. We sell these pellets individually, or in little greenhouse grow dome kits. If you’re wanting the easiest soil option, we also have seed cell kits that already are filled with organic seed starting soil. Pop in your seed, water it, & you’re good to go!
MOISTURE: Consistent moisture is KEY for germination. Make sure the soil is always damp, but not soaking & drowning the seeds. This is where grow domes come in handy. They provide a greenhouse effect, which keeps humidity & moisture trapped inside. Once your seeds have sprouted, remove the dome & gently begin watering. You can water with gentle overhead sprinkles (the babies are fragile!) or you can bottom water your sprouts, letting them sit in water for 20-30 minutes & then removing them… good to go!
WARMTH: Soil warmth should be around 65-80 degrees. Many people rely on sunlight or grow lights to provide the warmth, but if you’re in a chilly area like the basement, heat mats work wonders! Even farmers will use heat mats inside the greenhouse to quickly raise the temperature of the soil! This will really boost & speed up germination time! Find them here in our Garden Center!
HARDENING: Come spring, once temperatures are above freezing, begin to set your sprouts outside for an hour or so, on a cloudy day… gradually increase their outside time & sunlight exposure so they adjust to being outside! This gets them ready to take on the elements once you plant outside!
PLANTING OUTSIDE: Once frost is past & your seedlings are hardened, it’s time to transplant them into the ground! Use those handy dandy seed packet instructions to figure out spacing! Dig a hole just big enough for the roots to fit into… & make sure to pack the soil closely so there’s no air pockets. Give them a drink & we’re off to the races! YeeHaw!
How to force branches!
Forcing Branches
A beautiful vase of flowers is a perfect remedy for chasing away the late winter blues, when all we really want is to see is the light of spring at the end of winter’s tunnel! Bring a bit of spring indoors by gathering branches of flowering trees and shrubs, and then forcing them to bloom inside the house.
The warming weather trend offers us the perfect opportunity to do this! As temperatures rise above freezing, select and cut branches that have some nice, fat buds. Cut a few more branches than you think you’ll need, just incase some of them don’t absorb as much water as they will need to open up. Using a very sharp pruning shear or knife, carefully split the cut end. Place the branches in a container of warm water and re-cut another inch from the base of the stem. This will help to prevent air from entering the stem through the cut end, which can block the intake of water. Remove any buds or twigs that will be under the water.
Place the containers in a cool room, changing the water every two or three days. Now, be patient! It may take a couple of weeks for the buds to open. Generally, the closer the plants are to their natural bloom time, the faster they will force open. When the buds begin to show some color, move the containers into a spot where you can enjoy the show, but keep them out of direct sunlight.
Forsythia and pussy willow are really easy options for late winter forcing, but there are many other choices! The blossoms of dogwood and witch hazel will brighten any room! If you are attracted to more subtle colors, try forcing filbert for its lovely soft green catkins or fothergilla for fragrant, white bottle-brush shaped blossoms. You could also try flowering quince and ornamental cherry. And for a big pop of pink, sacrifice a couple branches of your saucer magnolia or redbud.
Conveniently, late winter is the best time to prune many deciduous trees and shrubs. So when Mother Nature offers us a day or two of warmer weather, we jump at the chance to knock a few chores off of our March & April garden-to-do lists! You might find that some rooting takes place during the forcing process, especially on dogwood and willow branches. If you’d like to plant the branches, wait for the roots to grow at least 1/2 of an inch or so. Then remove them from the vase and trim the branch back so that 2 or 3 buds remain. Pot the stems up individually in containers filled with seed starting mix, making sure that you keep the soil moist until permanent roots are formed. When the weather warms up, you can plant your new baby plants in a protected spot!
How & When to Plant Bulbs
HOW & WHEN TO PLANT BULBS!
Bulbs are precious little bundles of flower power that make us wait weeks, sometimes months, for results — but boy, are they worth it!! The term “bulb” refers not only to true bulbs, but also plants with tuberous roots, tubers, corms, and rhizomes. The information here can be applied to all of these! With a little basic knowledge, anyone can grow beautiful bulbs! Here’s how:
-PLANTING BULBS-
-WHEN TO PLANT BULBS-
In our area, Spring-flowering bulbs can be planted as soon as the ground is cool, evening temperatures average 40° to 50°F, and ideally 6 to 8 weeks before the ground freezes. Come shop for bulbs now for the best availability! Bulbs can be stored in a dry cool place until planting if needed. Summer-flowering bulbs should be planted in mid to late spring.
-WHERE TO PLANT BULBS-
Here’s a cool thing: As long as you make sure that your bulbs have good drainage and sunlight, you can plant them just about anywhere!! Drainage is critical to keep bulbs from rotting. They like loamy or slightly sandy soil because it provides the drainage and nutrients they need to survive & thrive! Another cool thing: Early-spring bloomers can be planted under deciduous trees where they’ll get enough sun to bloom before the tree’s leaves block out the light!
-PLAN BEFORE YOU PLANT-
Bulbs can be grown in many ways — formal gardens, meadow gardens, under trees, or strategically planted throughout beds and borders. Many bulbs will multiply, coming back year after year, so if you take this into consideration & plan carefully, you can have years of enjoyment from one planting. Once your bulbs have established & multiplied, you can split them & plant more in other areas! Planting in clusters provides greater visual impact, drawing your eye to a larger mass of foliage & color! There’s nothing prettier than seeing large areas full of flowering tulips!!
-
Take into account bloom time — plant a combination of early, mid & late-season bloomers to enjoy your bulbs for an extended season! It’s a good idea to plant your early spring bloomers in back & your later season bloomers in front… this way your later season bulbs will hide the dying foliage of your early spring bulbs!
-
Layer plant heights from front to back when planting varieties that will bloom at the same time so you can see all of your beautiful blooms!
-
Many bulbs are actually perfect for container planting! Bring them into view when they’re blooming and move them out of the way when foliage is wilting and when dormant. You can leave them in their container & winter them over in a cool, dark place like your basement or garage! When you plant them in a container, you can snug them right up next to each other and fill your pot full!
-
Bulbs provide bright, vibrant color — think about how those colors will blend with their surroundings! Choose colors that will accent the rest of your plants!
-HOW TO PLANT BULBS-
Bulbs can be planted in layers by digging up an entire area down to the proper depth, placing the bulbs and covering; or in individual holes dug for each bulb. Figure out the planting depth for the type of bulb you’re planting. If planted too deep, flowers will bloom late or not at all. If planted too shallow, new growth may become exposed too soon and risk damage by cold temperatures. If you are unsure of the exact planting depth, a good general rule of thumb is to plant the bulb 2 to 3 times as deep as the bulb is tall!
-
Prepare the soil by loosening it and mixing in good compost if needed for added nutrients. Special bulb fertilizer or blood meal can be added to help your bulbs thrive, which we carry here in our garden center!
-
Place the bulbs with the pointy-end up and with the roots down. If you’re not sure of the top or bottom of the bulb, plant it on its side and it will find its way to the surface! Smart little fellas.
-
Cover with soil and a light layer of mulch.
-
Newly planted bulbs should be watered well to get settled in.
-AFTER-CARE-
For all bulbs, after blooming, cut only the flower stem back. Leave foliage intact until it turns yellow and wilts to the ground… the bulb sucks the energy & nutrients out of the leaves and back into the bulb to store until next year! How cool is that? If the foliage is cut back too soon, bulbs might not perform very well the following season.
Three easy tasks to Winter-prep your shrubs & evergreens!
Winter naturally does some good work taking care of our plants without our help. The steady drop in temperature helps our plants go dormant and any lasting snowfall insulates plants against freezing temperatures & icy winds. However, there are a few simple winter-prep tasks that we can do for our shrubs & evergreens to show them a little love & help protect them from damage & stress!
Simple task #1 : Deadhead LARGE spent blooms
While dried flowers can add some texture & appeal to your winter landscape, it might not be a bad idea to trim up some of your shrubs that are heavily exposed to the harsh winter conditions. A large spent flower, such as a panicle hydrangea bloom, can easily be caught in a strong wind or weighed down by heavy snow, causing the branch to snap. Depending on the location of your shrub, some pro-active pruning might do your plant some good! Take a walk through your yard & look at your shrubs that are the most exposed to the elements, & take a minute to snip off those big blooms, cutting just above a set of leaves. Hydrangea bushes & rose bushes with large single blooms or even a full spray of roses on a stem are the most easily weighed down, & it doesn’t hurt your plant one bit to snip them off!!
Simple task #2 : Check mulch levels
If you’ve done that lovely activity of laying down fresh mulch before winter, go back and double check around the base of each shrub and evergreen. While mulching does help protect your plants through the winter, we wanna make sure that you’re doing it the correct way! You’re going to want a nice level layer of mulch around your plants. Brush back any mulch that is touching lower branches. Mulch that’s mounded around a shrub, tree or evergreen can cause problems such as:
-soggy soil, bottom branch rot & root rot
-pests nesting in the mulch mound & snacking on the delicate outer layers of branches
-fungus growth in the root ball & on lower foliage
Simple task #3 : Water your young evergreens & new plantings
Lack of water is the #1 cause of winter burn!! What is winter burn? Essentially, winter burn occurs when the cold, harsh winter winds have sucked all the moisture out of a plant’s roots up through it’s foliage. A plant’s foliage transpires moisture straight from the plant’s root ball, so if the plant didn’t have any moisture in it’s roots when it froze, there’s no moisture left to transpire. Since the plant is dormant, the moisture cannot be replenished, which leads to serious dryness & winter burn. The damage from winter burn can be minor such as dry, brown needle tips & leaf edges…or worst case scenario, entire branches can turn brown & die. Some plants can even die entirely. To help avoid this, water your plants deeply before the ground freezes, usually mid-November, to give them enough moisture to last through the winter!
These three quick & easy tasks can make a world of difference to your plants!! Love them well!

Let's talk about Wilt-Pruf!
Let’s talk about Wilt Pruf!
Wilt-Pruf is an anti-transpirant spray… what is that?! An anti-transpirant is a spray that provides a protective waxy coating to reduce water loss from a plant’s foliage. Transpiration refers to the exhalation of water vapor from a plant, so an anti-transpirant prevents this. Excessive moisture loss from plants causes severe wilting, shock, or even… DEATH! OH NO! This can happen easily during the winter when drying winds & frozen ground deprive plants of their natural moisture intake. This can also happen when plant roots are disturbed during transplanting, during periods of drought, or when Christmas trees & fresh evergreens are cut. Spraying with Wilt-Pruf will cover your plant’s foliage or cut greens with a long lasting protective coating which will hold in moisture, reducing water loss! We even spray our fresh evergreen wreaths to help them stay green longer!
When to spray:
You can spray anytime as long as it’s not cold enough that the spray will freeze directly onto the foliage. Spray Arborvitae, Cypress, Boxwood, Rhododendron, Juniper, & Cedar in the late fall.
Frequently asked questions:
Will you be able to see Wilt-Pruf? NOPE! After it dries, it forms a completely clear, flexible protective coating! It might turn blue spruce more of a green shade temporarily until it is completely dry.
Will Wilt-Pruf harm my plants? Not at all! This is completely safe for your plants. It will not interfere with plant growth & it will not affect the plants respiration, osmosis, or photosynthesis. It won’t hurt you or animals either! Wilt-Pruf is organic, biodegradable, non-toxic, & non-hazardous.
How often do I need to apply Wilt-Pruf? One application will last three to four months! Other anti-transpirant sprays will crack & flake off, leaving your foliage with no protection. Wilt-Pruf actually forms multiple layers… as the top layer wears off & flakes away, it reveals another layer underneath, making this the best, longest lasting horticultural anti-transpirant available on the market!

Autumn Interest
It sure has been a hot and humid summer. It’s a fact, sad but true though, that summer is winding down. The season of extended days never seems long enough, but it’s time for gardeners everywhere to reap what they have sown and enjoy the beauty of AUTUMN!
For a quick fall refresh, give your garden borders and containers a quick pop of color by replacing tired looking Impatiens & Geraniums with plants that will thrive in the cooler temperatures to come. Zinnias, Celosia & Garden Mums are great options! They’ll provide a lot of color through summer’s end and into mid-autumn. And if you’d rather plant perennials, don’t forget about Asters or Ornamental Grasses. They’ll be spectacular as they begin to flower!
Keep applying fungicide on any plants affected by Powdery Mildew as long as the weather stays warm and humid. We’ve been seeing it on Peonies, Lilacs, Phlox and Ninebark. We suggest Copper Soap or Broad Spectrum Fungicide which we carry here at the Garden Center!
A great way to enjoy Autumn color in your own yard is to plant as many trees, shrubs and perennials that have Autumn interest as possible. Then sit back and enjoy the season’s painting in your own backyard!
Here’s our go-to list of plants with some great fall interest!!
Large shrubs: Virginia Sweet Spire, Fothergilla, Viburnum, Burning Bush.
Smaller shrubs: Spirea, Dwarf Sweetspire, Summersweet, Diervilla, Azalea.
Trees: Pacific Sunset Maple, Sun Valley Maple, Crimson Sunset Maple, October Glory Maple, Ginko, Redbud, Black Gum, Crabapple.
Keep in mind that good fall interest isn’t limited to woody plants. Plenty of perennials can put on an eye-catching show. Try Aronia, Sedum, Amsonia, Coral Bells, Anemone, Aster, Hibiscus.
We have everything you need to turn your yard into a place of autumn beauty! Come take a walk through the nursery and see what catches your eye!

Fall is for planting!
Fall is an ideal time to plant most types of perennials, shrubs & trees! During the Fall, the relatively warm soil and cool air help the plant’s roots get established more quickly without putting too much stress on the plant. Since the roots are the foundation of the plant, you can give them a nice head start by planting in the fall. Let’s dig a little deeper into WHY you should plant in the fall!
Many people are surprised to learn that autumn runs a close second to spring as an ideal planting time, but it’s true: cool temperatures, reliable rainfall, and short, bright days help plants make a quick and easy transition to your landscape. Despite the cold weather lurking around the corner, the entire first half of autumn (and then some) provides ample opportunity for plants to grow roots and get off to a good start in their new home. Before you come visit us, there are a few things you should know to ensure success with fall planting:
- Get everything in the ground before the ground freezes! If you still have plants in their nursery pots, get them in the ground before winter, no matter how late it has gotten. The plants will be much happier and better protected in the ground than in their thin plastic pots, so even if it’s getting quite late in the season, just plant them where you can. You can always move them come spring if you change your mind!
- Provide supplemental water when needed. Autumn weather can be quite cool and rainy, but that doesn’t mean that new plantings should be ignored, particularly if the weather has been dry and/or windy. Water all plants thoroughly after planting, and continue to water them as needed until the ground freezes.
- Mulch!! Just as you pile on blankets and quilts when the temperatures drop, mulch acts as insulation for plants. Mulch also creates the ideal environment for vigorous root growth, which helps new plantings get off to a good start. While even established plants benefit from a nice layer of mulch, newly planted specimens especially appreciate the protection it offers from the challenges of winter.
- Know what to expect! You won’t see much top growth emerge on fall-planted shrubs, but this is actually a good thing: any new growth that the plant produces now will be too soft to survive the impending cold anyway. Autumn planting is all about giving the plant a chance to put on root growth. Plantings will be ready to grow in the spring thanks to the roots they create in fall!
- Bonus tip: All of these guidelines apply to transplanting as well as new plantings, so if you’ve been considering moving something that’s already a part of your landscape, fall is a great time to do it!

Landscaping
ten forever favorite landscape shrubs!
Here’s a look at 10 forever favorite landscape shrubs! Start researching & deciding which plants to add to your landscape this year! The time is NOW! This warm weather is getting us excited for P L A N T S !!!
1. Wine & Roses Weigela : The standard for purple-leafed weigela, Wine & Roses is used in landscapes across North America as mass planting & foundation plant.
2. Limelight Hydrangea : This award-winning hardy hydrangea is a landscape staple. Excellent as a show-stopping hedge or specimen plant.
3. Summer Wine Ninebark : This cold-hardy, adaptable native is a good mass planting or hedge for exposed sights. Good powdery mildew resistance.
4. Show Off Forsythia : The exceptional flowers display & compact size of this variety of forsythia makes them a superior choice for landscapes.
5. Black Lace Elderberry : Color + texture = excellent design. More adaptable than Japanese maples, Black Lace is a striking accent plant.
6. Lo & Behold Buddleia (Butterfly Bush) : Heat-tolerant, deer-resistant, dwarf Lo & Behold Buddleia is a non-invasive way to add fragrance & pollinator appeal to landscapes. Excellent for mass planting.
7. Little Lime Hydrangea : This is the dwarf form of Limelight Hydrangea… the same easy flowering & unusual color of the original, but only 3-5′ tall.
8. Incrediball Hydrangea : An improved variety of hydrangea with LARGE flowers held upright on sturdy stems – no flopping!
9. Little Henry Sweetspire : A dwarf form of native Sweetspire. Little Henry has fragrant white summer flowers and good fall color. It is an excellent shade-tolerant choice for mass plantings.
10. Double Take Flowering Quince : Large, double blooms that look more like camellias than quince. These are thornless & heat-tolerant. They will not litter landscapes with unwanted fruit, & they makes a beautifully durable hedge or specimen plant.
Choosing the perfect tree shape!
Choosing the perfect tree shape!
Trees have many different growth habits, shapes & sizes. Here’s 6 of the most common tree shapes & some information that may help you decide which would fit the best in your landscape!
Round:
-
Great shade trees because of their wide canopies
-
Single specimens make a statement
-
Create solid backgrounds when grouped
-
Soften edges of buildings nicely
Examples- Ohio Buckeye, River Birch, Red Maple, Tulip Tree, White Oak, Katsura Sweet Gum
Vase:
-
Few lower branches, perfect to set a chair under
-
Won’t block visibility when lining a street or driveway
-
Arching branches on a central trunk, widest at the top like a vase!
-
The top of the tree may be rounded, flatter or irregular, each tree is unique
-
Are striking as single specimens
Examples- Serviceberry, Redbud, Japanese Lilac (Ivory Silk)
Weeping:
-
Make interesting focal points
-
Are good in tight spaces
-
Flexible branches droop down naturally
-
Work well on retaining walls, where branches can cascade to a lower level
-
Often provide movement or sound when rustled by a breeze
Examples- Weeping White Pine, Weeping Norway Spruce, Weeping Beech, Weeping Cherry, Weeping Redbud
Columnar:
-
Make good hedges, windbreaks or screens
-
Create a nice focal point when several are clustered together
-
Trees are about one third as wide as they are tall
-
One or a pair creates a formal accent to an entry
Examples- Slender Sillouette Sweet Gum, English Oak, Crimson Sentry Maple, European Hornbeam, Irish Yew, Juniper
Pyramidal:
-
Heavy, structural presence makes this shape great for a screen or windbreak
-
Wide, cone shaped
-
Strong shape frames the corner of a house nicely
Examples- Columnar tulip tree, Colorado Spruce, European Larch, Little Leaf Linden, Red Point Maple, Bosnian Pine
Irregular:
-
Can fill up a lot of space
-
The canopy is often broad with horizontal branching near the top
-
Provide shade in a casual landscape
Examples- Sycamore, Burr Oak, Skyline Honey Locust, Kousa Dogwood
Twisted Trunk, Oils, and Vinegars
10 different ways to use balsamic!
Usually when you reach for a vinegar, it’s to dress a salad… but there are so many other avenues of brilliant culinary uses for balsamics! In this blog we’re going to lightly explore ten different ways to use balsamic vinegar in the foods & drinks that can be enjoyed on a daily basis!!
First, lets get this straight… this isn’t your mama’s strong, slap in the face, pungent distilled white vinegar… not even close. In fact, this isn’t even similar to that apple cider vinegar that makes your eyes water when you take a whiff…
Balsamics can have many different flavors, complexities & consistencies, depending upon whether they’re a simple vinegar, aged or reduced. Ours are barrel aged… this type of aging makes our balsamic slightly sweet with a thicker, smoother consistency. Because of this, they are considered a “drinking vinegar”! With this thicker, almost syrupy consistency, reducing these balsamics to a glaze is super easy, making them awesome for all different kinds of cooking! Lets get started on our ten uses!
#1 Start a sauce: Balsamic is great in a sauce like a barbecue sauce. It balances out the sweetness of brown sugar & brings out a nice sweet tang in your sauce! Many different sauces can be made with balsamic!
#2 Make a cocktail: You can add a splash of balsamic in any drink you can think of to boost flavor & appeal. From your fave old fashioned to sangria to a bellini! It’s great mixed with bourbon… the balsamic adds a little acidity, a little bite & some beautiful sweet floral tones! Non-alcoholic drinks can also be made with soda, lemonade, sparkling water, juice & kombucha! (See our recipe for wellness shots!)
#3 Add to dipping oils: Create your own appetizer at home & feel just like you’re eating authentic Italian! Swirl olive oil, Italian spices & balsamic in a dish & use it as a delicious dip for your favorite warmed up, toasted bread!
#4 Fruit: This is so simple & so good! Literally just drizzle a little balsamic over fresh or baked fruit… so yummy! If you’re a lover of baked goods, try some balsamic drizzled over top of your favorite fruit cobbler!
#5 Swirl into soup: Add a bold flavor to your soups & stews by adding a little (or big) swirl of balsamic to your bowl after serving! Swirling in a little sour cream to balance out the flavors is a great idea!
#6 Braise meat: When braising meats, especially pork, balsamic adds a rich & robust flavor to meat! You can save the braising liquid to serve over mashed potatoes or rice. BIG flavor! No waste!
#7 Drizzle over roasted veggies: Balsamic glaze makes a perfect finishing drizzle for brussels sprouts, asparagus, carrots, potatoes, broccoli, cauliflower, eggplant, onions & green beans… etc! The incredible flavor that can be added to simple foods is astonishing.
#8 Mix into yogurt or fruit parfaits: Start with a bowl of plain greek yogurt (or vanilla yogurt if you prefer) & mix in some balsamic with a sweetener like pure maple syrup, local honey or agave etc. Top with nuts, fruit & granola!
#9 Serve on sweets: Aged balsamic has a surprising sweetness that pairs well with desserts. The acidity of balsamic really brings out the sweet flavor notes in ice cream, tarts, brownies etc! Our dark chocolate balsamic vinegar is to die for on chocolate desserts!
#10 Whip up a marinade: Up the flavor of your meats when you add balsamic to your marinade. Plus, vinegar is a natural meat tenderizer!
Stop in and talk with our professionals at Twisted Trunk to discover more great ways to use our balsamics!
Aroma Coffee & Café
Aroma Cafe Drink of the Month KOMBUCHA!
Kombucha is a traditional fermented drink made of black tea and sugar.
Kombucha is a traditional fermented drink made of black tea and sugar. It contains a variety of vitamins, minerals and enzymes and has been prized by traditional cultures for its health promoting properties.
The SCOBY, or Symbiotic Colony of Bacteria and Yeast, is the collection of microbes responsible for turning sweet tea into a probiotic beverage. Essentially, it is a living colony of beneficial organisms that turn sugar into healthful acids and probiotics.
As mentioned, this tangy fermented beverage contains beneficial probiotics and acids. It is lower-calorie than other carbonated beverages like soft drinks, with only about 30 calories per cup (8 ounces). Kombucha is fat-free and does not contain any protein.
Kombucha Benefits and Probiotics
This ancient health tonic is attributed with several health benefits. The nutrients it contains are wonderful at supporting the body in various ways. It is important to note that while there is an abundance of anecdotal evidence from avid supporters, studies about kombucha are lacking. But then again, so are studies about flossing but everyone seems to be pro-flossing.
To be clear- it isn’t some magic pill or silver bullet, but it may help the body function well by supporting:
- Liver detoxification
- Increased energy
- Better digestion
- Helps nutrient assimilation
Natural Detoxification and Liver Support
The liver is one of the body’s main detoxification organs. Kombucha is high in Glucaric acid, which is beneficial to the liver and aids its natural detoxification. As Kombucha also supports healthy gut bacteria and digestion, it helps the body assimilate food more easily and provides quick and easy energy without caffeine.

Immune Boost
Kombucha is naturally high in antioxidants and supportive of the immune system. Again, there is no magic pill or silver bullet when it comes to immune function- it is best to support the body in its natural immune process.
Bottom Line
Many people love Kombucha because of its taste. The internet abounds with anecdotal stories of its benefits. Research doesn’t yet support its health-promoting properties, but it is generally considered safe to drink if from a reputable source. We do know that it is a good source of probiotics, enzymes, and beneficial acids, and a decent source of B-vitamins. It can be made at home or found in many stores. Like with any raw/fermented product, those with any health condition or who are pregnant/nursing should check with a doctor before consuming.